CC Theater Help

CC Theater is a full-featured captioning tool for use with live theater. It can be used for displaying:
The following are required to run CC Theater:
After installing CC Theater, follow these steps to get up and running quickly:
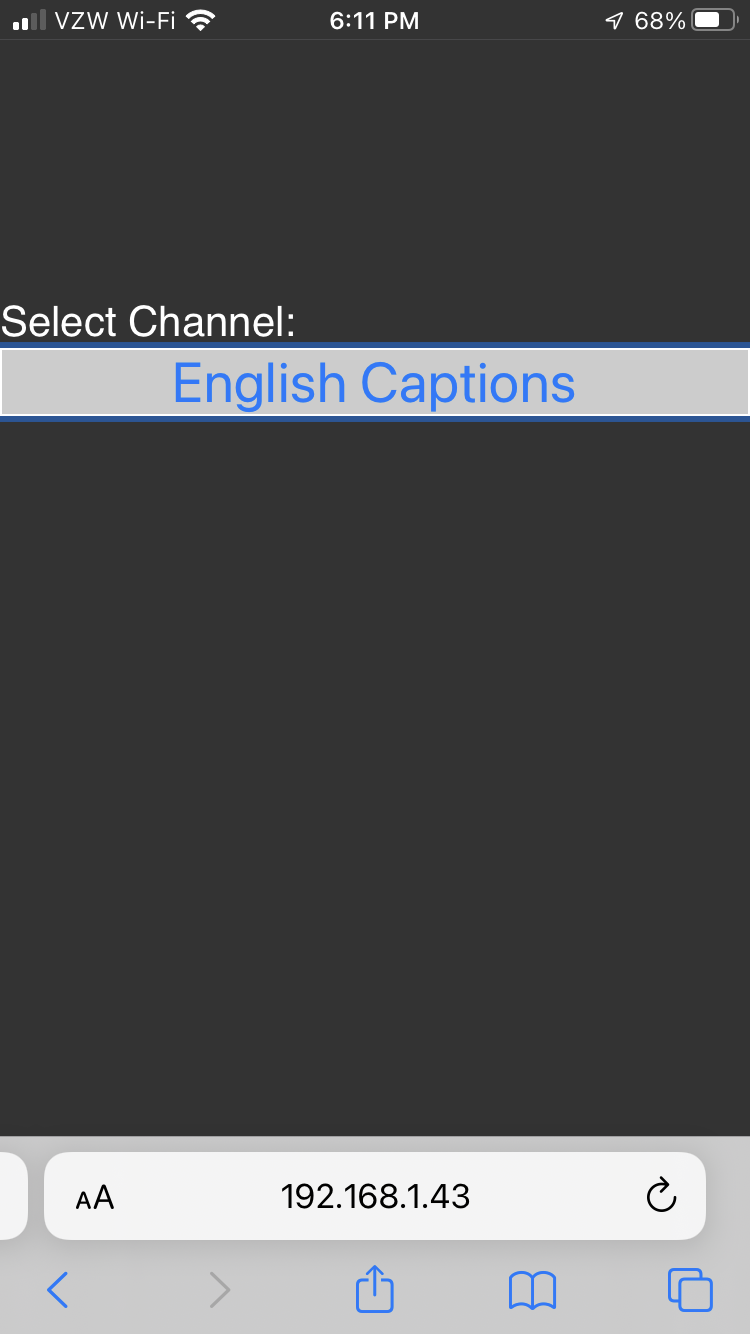
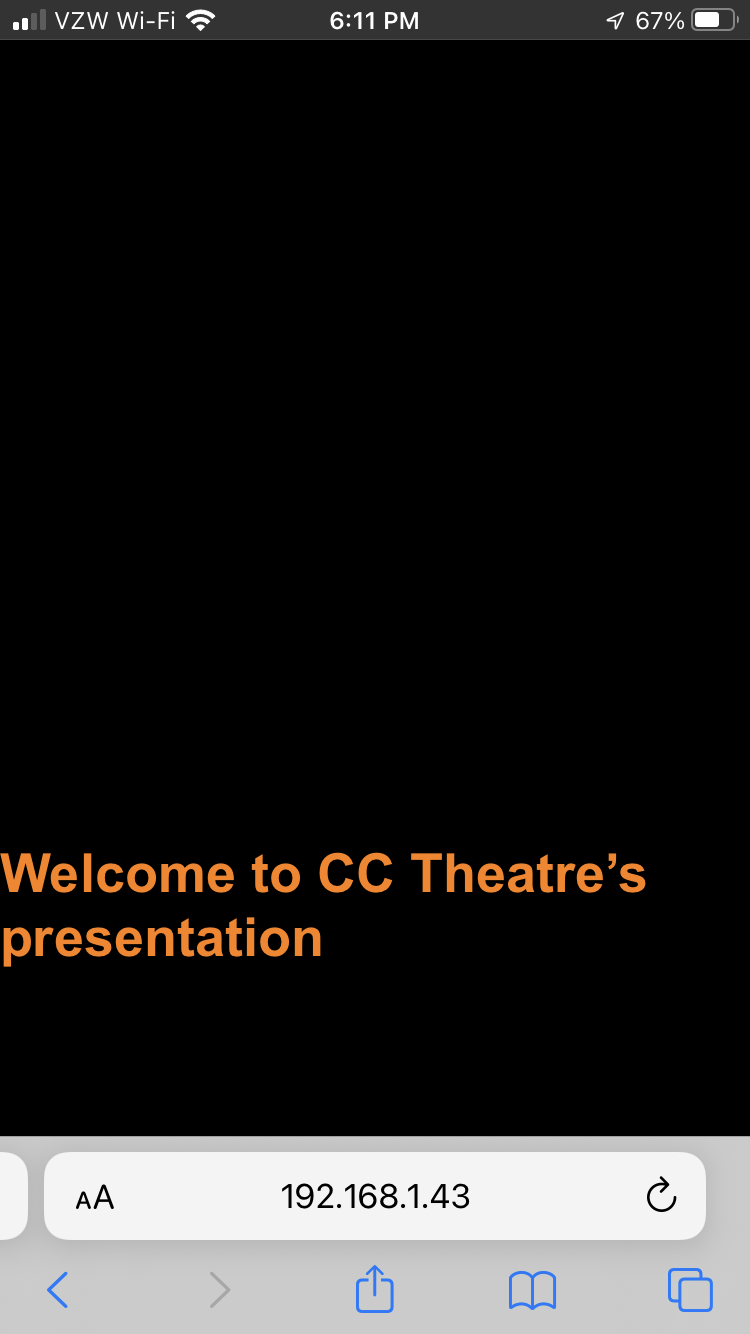
The two images below show what a patron would see on a smart phone with its browser pointing to the CC Theater web server. Patron Figure 1 shows the language picker, and Patron Figure 2 shows the browser displaying the most recent caption.
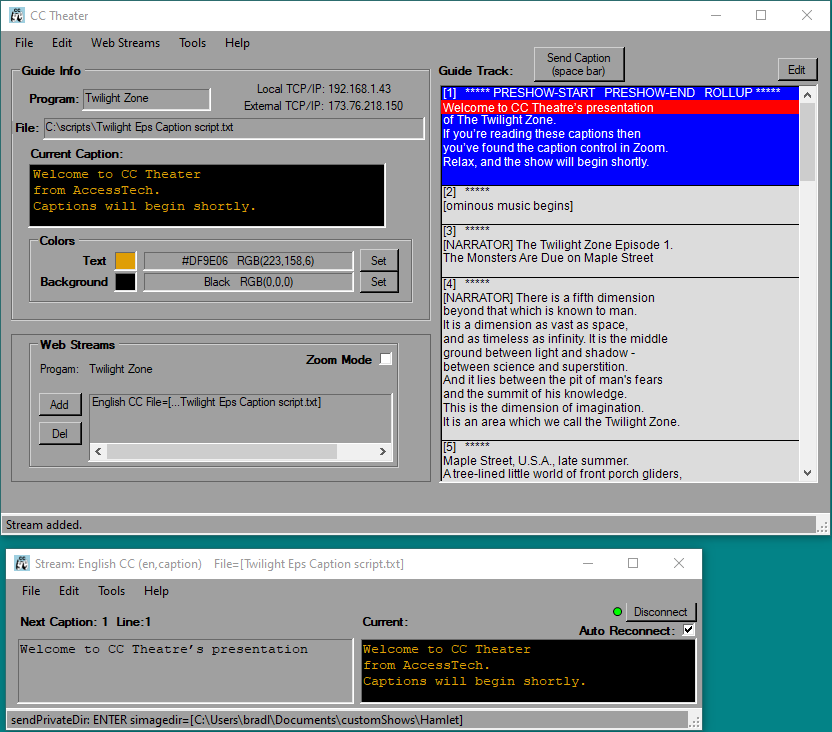
This is the main window of CC Theater. It allows you to load a script, gate out captions as lines are spoken, and start/stop pre-show looping. There are several user interface components, as described below.
>
Refer to the figure above:
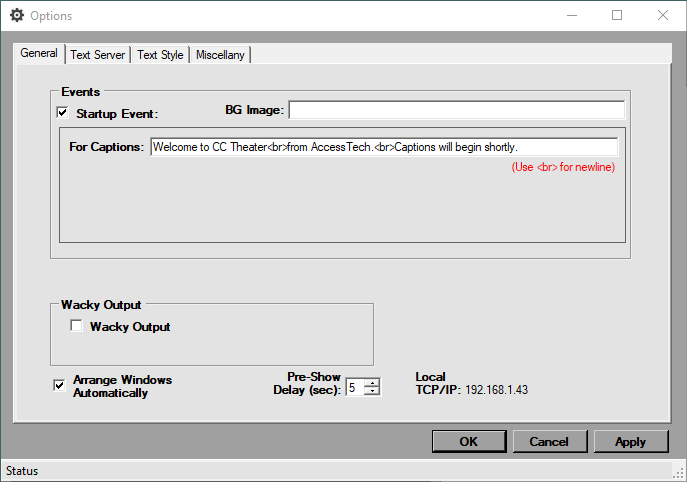
The Options window allows you to set up common preferences which are saved between sessions.
This is the General tab of the Tools > Options window of CC Theater. .
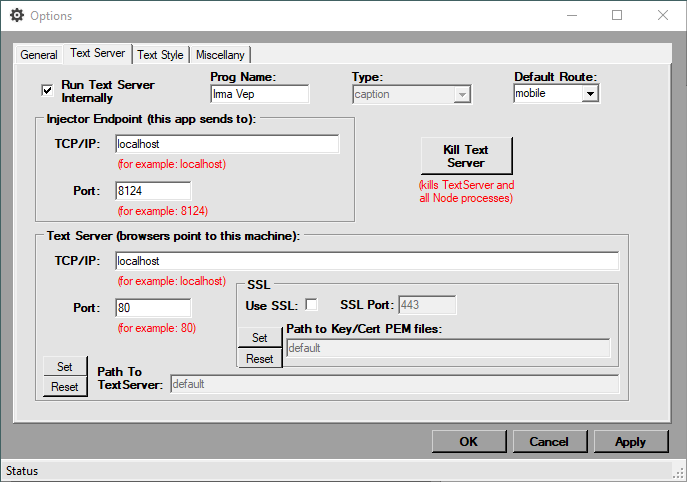
This is the Text Server tab of the Tools > Options window of CC Theater. .
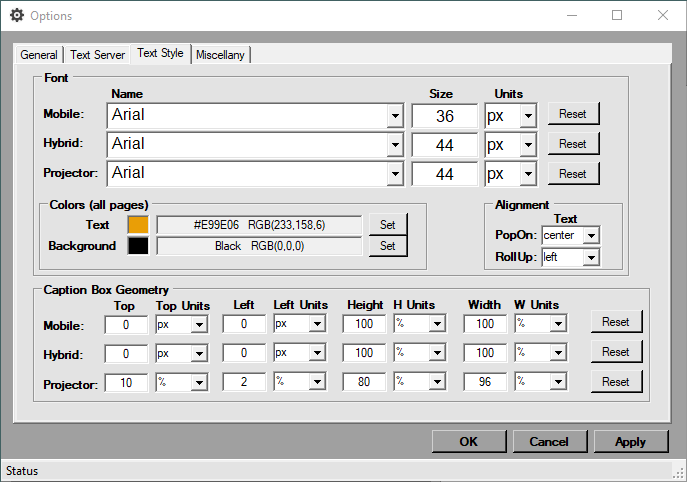
This is the Text Style tab of the Tools > Options window of CC Theater. .
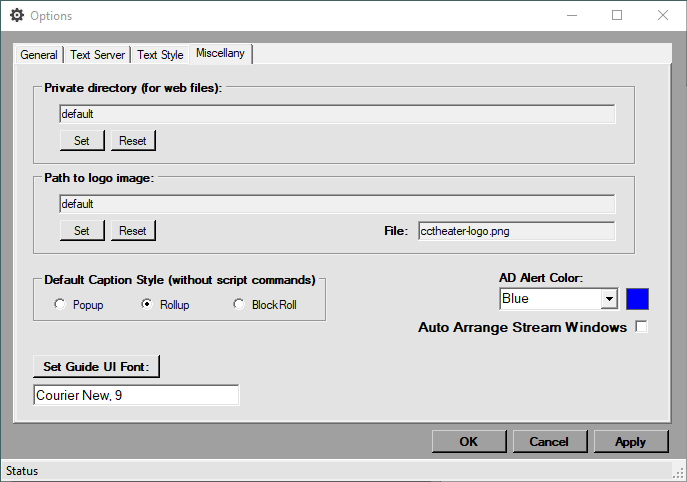
This is the Miscellany tab of the Tools > Options window of CC Theater. The settings in this area are for advanced users, and should not be changed unless you really know what you're doing.
CC Theater responds to drag-and-drop for loading script files:
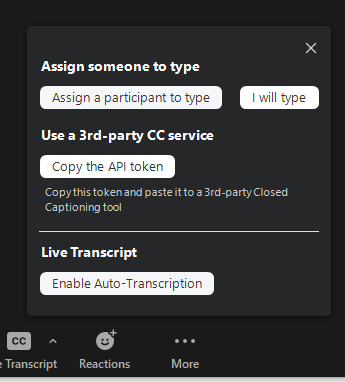
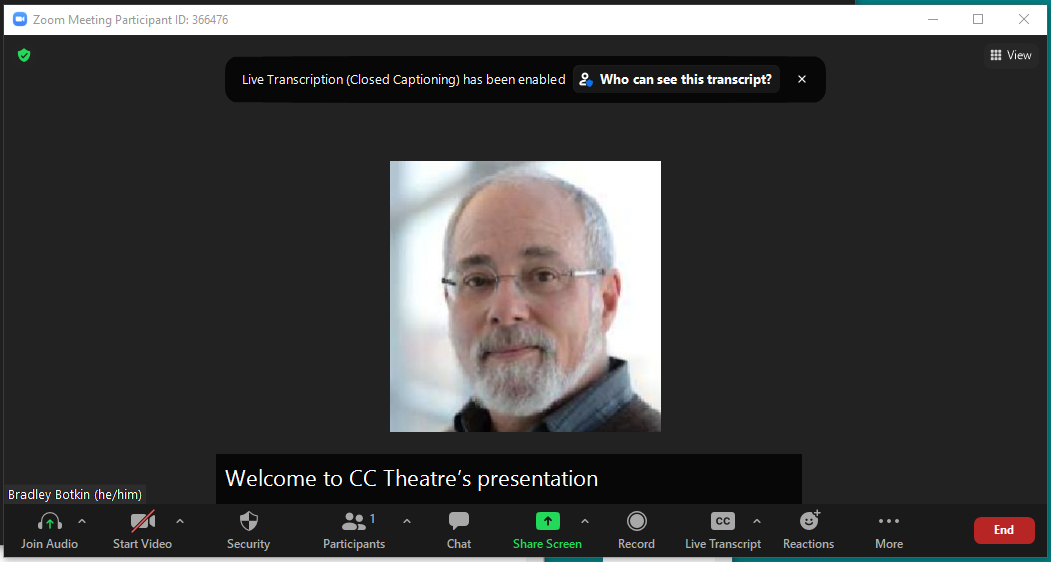
CC Theater can send captions into a Zoom meeting, which you might be using for social distancing and remote performances. When you check the Zoom Mode checkbox in the main window, the Zoom Captioning window is displayed (see below). To set up Zoom captioning:

If you wish to display open captions for all patrons to see, you can use CC Theater's projector page. This is really just a special web page which responds to additional Script Markup in the script file. To use the projector features, you could connect a digital projector to your CCTheater computer, and make sure the display settings EXTEND THE WINDOWS DESKTOP. Then open a browser window on the projector display and point the browser to:
(simplest setup): http://localhost/projector (general case): http://[your server address:port]/projectorThe general case above might be useful when the projector is connected to a computer which is not the CCTheater computer. I that case, the projector's computer acts just like a patron's device, except that it opens the projector version of the webpage, see below.
The projector page is similar to regular (mobile) page in terms of how captions are rendered subject to the Script Markup. The default projector page is completely sufficient to provide basic projected captions at the front of the theater. It defaults to white captions on a black background (or whatever color is set in CC Theater.) Some productions, however, prefer to use design elements for the background of the screen, sometimes changing the background for different scenes. To facilitate this, the projector page reacts to the background image markup command:
#background=xyz.pngIf you precede a caption with the #background markup, the projector page will load the specified image file as the background of the page when the associated caption is displayed, and captions and the enclosing rectangle will be overlayed on the background. A background image will persist until a new background image is called for in the script.
Additionally, when the projector page loads the background, it also looks for a corresponding CSS file of the same basename (e.g. xyz.css) and loads that as well. Using the CSS file, you can change features that may not have explicit setters in the CCTheater interface. The following CSS example adds a red 2-pixel solid border to the caption box:
#dataDisplay .captionPane {
	border: 2px solid red;
	}
Note that certain CSS styles that correspond to existing script commands such as text color, alignment, and box geometry will no longer override styles that are set in the user interface or script commands. For example, to display a background which has a hole cut for the caption box, include a corresponding #box= script command in the same caption block that has the #background= script command.
Note: Ornate backgrounds and colors are not recommended. These may simply be a distraction from the main purpose of the captions, which is... to provide captions to patrons.
FILENAME - The caption file to sequence. Do not precede with a forward slash.
/w - secondary webstream script file. The next parameter should be the full path to the script file.
Example command line call - C:> cctheater c:\directory\myEnglishFile.txt /w c:\directory\mySpanishFile.txt
A caption script is a plain text file organized as a series of text blocks, with each block separated from the next by one or more blank lines. A text block consists of comments (ignored), script commands, and one or more lines of text (dialog). Comment lines begin witha ";". Script commands begin with "#", and define things like caption styles, background images, and such. The following is a simple example of two sequential text blocks:
;Text Block #1
;Comment lines (beginning with a semicolon) are ignored
;This comment line is part of the first text block. The next line is a script command
FRANCISCO: For this relief much thanks.
’Tis bitter cold, And I am sick at heart.

;Text Block #2
;This comment line is part of the second text block
BARNARDO: Have you had quiet guard?
The first text block above contains a two-line caption The second text block has just a single line in it.
A typical caption script would be a long list of text blocks, saparated by a blank line between each block. The caption script is simply a derivative of the play script, with extraneous pieces, like stage direction, etc., removed. A CCTheater Operator listens to the actors deliver their lines, sending out each entire block or a single line of a block (depending on the caption style, but more on that later) as the actors deliver their lines.
Here's another example:
;Text Block #1
#pop
Welcome to tonight's performance of
Hamlet
The show will be gin shortly

;Text Block #2
;ACT I
;SCENE I. Elsinore. A platform before the Castle.
;Enter Francisco and Barnardo, two sentinels.
#roll
BARNARDO: Who’s there?

;Text Block #3
FRANCISCO: Nay, answer me. Stand and unfold yourself.

;Text Block #4
BARNARDO: Long live the King!
Notice the #pop command on the first block while the second block has a #roll command. The pop/roll/blockroll commands set the captioning style, how the text is added to the display. It's probably the single biggest decision for caption script preparation, how the captions will be displayed on devices.
There are three styles: Roll-up, Pop-on, and Block-Roll.
In the second example script above, notice that the second and third blocks contain no caption style directive. The answer is that the caption style directive is sticky. That is, the style from the previous block persists until a new caption style is encountered for a text block. When CCTheater loads this script, it creates two internal events, one for each block. As it reads the blocks, it remembers the setting from the previous block unless it finds a new directive.
From the Operator's perspective, they first see a 3-line caption pending and pop-up style is declared. The caption is designed to welcome caption viewers before the show starts, so the operator gates it out before the show actually begins. The patrons see that welcome message filling the screen when they connect to CCTheater. As the show begins, Barnardo delivers his line "Who's there?" The operator gates out the subsequent (one-line) captions. Patrons see each caption scroll in from the bottom, with a blank line between the captions CCTheater inserts those blank lines between text blocks. For roll-up text blocks with multiple lines, gating out the caption sends one line each time until the entire text block has been sent.
The "text" flavor of a description script (#type=description.text) is basically the same as it's caption cousin. A text blocks contains the description that's to be gated out at the appropriate time. An example:
;Barnardo: The rivals of my watch, bid them make haste...
Horatio and Marcellus enter the room

;Francisco: Give you good night...
Francisco exits
You can see that a description.text script is essentially identical to a caption script, except that it has the text of a description which gets gated out. A patron who connects to that channel, and has their in-built screen reader (VoiceOver on iOS, TalkBack on Android) enabled on their device, hear's each description read aloud as it's gated out by the Operator.
The "audio" flavor of a description script (#type=description.audio) is a very different from a caption or text description script. Here's a portion of aan example script:
#config #language=en #type=description.audio #adsource=$PRIVATE/hamletAD.mp3 #adpreshowtrigger=00:22:14.350, 00:32:29.470, 0, loop

;Barnardo: The rivals of my watch, bid them make haste...
#adtext=bid them make haste... Horatio and Marcellus enter the room
00:00:04.162, 00:00:14.756
Note the strange bits of the form:
hh:mm:ss.sss, hh:mm:ss.sss, ss.sss, loopThose are called triggers. A trigger represents an index into an audio file, and it consists of a start time, a stop time, an optional delay time, and an optional loop indicator.
The #config line at the top of the example contains three important pieces of markup The #type=description.audio just tells CCTheater that this is a description script of the audio flavor.
The important part of the text block in the example contains a simple trigger consisting of just the start and end times. When the Operator gates out that trigger event, the preshow or whatever description might be playing stops playing and the specific audio sub-clip is played. Each sub-clip is short enough that it can play through to completion without butting up to a subsequent sub-clip.
Also notice the #adtext=xyz script command. The value of #adtext is displayed in the cell with the associated trigger. This can serve as a hint to the Operator about when the event should be gated out and what its sub-clip contains.
The two things to keep in mind during script preparation include:
The overall steps when starting with a play script are:
#- Configuration lines begin with a hash '#'. If using the special #config directive, it must be the first line in the file.
;- Comment lines begin with a semicolon ';' Comment lines in a caption block are displayed as tooltips when mousing in the guide track.
#config- If used, this should be first line of the file. It can be used to set up the following static parameters:
#program(DEPRECATED, DO NOT USE) In the #config line only, the name of the show. Currently ignored by the system.
#language=<value>- In the #config line only, <value> must be a two-letter language name (per ISO-639-1)
#type=<value>- In the #config line only, the type of stream. <value> can be any of caption or description.text or description.audio
#ccstyle=<value>- In the #config line only, optionally set the display style for the entire file for the captions. Styles can also be set on the fly, whether on a per-caption block, or per-line basis, see below.
#imagedir- (Projector Mode Only) In the #config line, specifies a directory where background images can be found. (This should only be specified once at the top on the #config line.
#imagedir=c:\mydirectory
#config #type=captions #language=en ccstyle=pop
#popon(STICKY, aliases: #pop | #popon | #popup) - At the top of a caption block, switches the caption style to "popon". Popon captions display the entire caption block on the screen, replacing the previous on-screen caption.
#rollup(STICKY, aliases: #roll | #rollon | #rollup) - At the top of a caption block, switches the caption style to "rollup". Rollup captions display each caption at the bottom of the screen, pushing the previous captions up.
#blockroll(STICKY, aliases: #blockroll | #blockrollup) - At the top of a caption block, switches the caption style to "blockroll". Block rollup captions display entire caption blocks (similar to #popon style) in rollup mode, rolling up from the bottom. This contrasts with pure rollup style, which is gated out a single line at a time. Blockroll style can be easier for the operator, since an entire caption blocks is sent at once. Be careful not to give away the punchline!
#continue(NOT STICKY, unset at next caption block) - Suppresses the blank line that is automatically inserted at the display before the start of the next caption block. This can be useful for longer monologues where the dialog is broken into multiple caption blocks in order to reduce the height of each row in the guide track.
#box=<value>(STICKY) Sets the position and size of the caption box. Values should be in the following format: top:NU;left:NU;height:NU;width:NU N is some valid number for the corresponding Unit, U. There are no color shortcuts.
#box=top:50%;left:50%;height:50%;width:50%
This is a
popon caption
lower right quadrant

#box=top:0%;left:50%;height:50%;width:50%
This is a
popon caption
upper right quadrant

#box=top:0%;left:2%;height:100%;width:96%
The left and right margins
are set to 2% of the screen width
leaving 96% of the screen width for text
Remember that #box=... is a STICKY setting, and persists until it is explicitly changed.
#textalign=<value>(STICKY) - Sets the alignment of the text. Allowed values are: left | center | right | default
#textalign=right
this block is
right aligned

#textalign=default
this block returns
to default settings
line of left text #left
line of centered text #center
line of right #right
and this line resets to default #textalign=default
Remember that #textalign=... (and related shortcuts) is a STICKY setting, and persists until it is explicitly changed.
#color=<value>(STICKY) Sets the color of the text. Allowed values are: known HTML color names | explicit RGB values in the format of #rrggbb where rr, gg, and bb are 2-digit hexadecimal numbers between the values of 00 (zero) and FF (255). There are no color command shortcuts.
#color=yellow
this block is
completely yellow
as defined by the browser

#color=#E99E06
this block is
sort of orange-ish
using color hex values

#color=default
this block returns
to default settings
line of red text #color=red
line of green text #color=#00ff00
line of text in default color #color=default
Remember that the #color=... command is a STICKY setting, and persists until it is explicitly changed.
#size=<value>(STICKY) Sets the font size of the text. Values must be in the form NU, where N is a number (integer or dcimal) and U is one of the allowable font-size units in CSS (rem, vw, %, em, px, etc. or default) (rem and px are most eaily understood, the others may have unpredictable effects.) A value of "default" references the setting in Tools / Options / Text Style / Font Size. While the font size is easily set in the UI, it can be useful to set it on the fly for multi-column (#preformat) captions where it's importantant to use a size that overcomes word-wrap.
#preformat #size=1.3vw
MAN:               WOMAN:              CHORUS:
Man line 1         Woman line 1        Chorus line 1
Man line 2                             Chorus line 2
                   Woman line 2        Chorus line 3
Man line 3         Woman line 3        Chorus line 4

#size=default
This is the caption following
the multi-column caption

#pop #size=68px
HAMLET
<line>
A Play by William Shakespeare #size=3.5rem
<line>
*Translated into modern English by Kevin Bacon #size=2.75rem
Remember that the #size=... command is a STICKY setting, and persists until it is explicitly changed.
#preformat(NOT STICKY, alias: #pre) At the top of a caption block, sets text font to system monospace. This allows for embedding spaces for columnar alignment. Particularly useful for songs with multiple intermixed singers singing over each other where multi-columnar formatting is desired.
#preformat
MAN:               WOMAN:              CHORUS:
Man line 1         Woman line 1        Chorus line 1
Man line 2                             Chorus line 2
                   Woman line 2        Chorus line 3
Man line 3         Woman line 3        Chorus line 4
#background, #bg- (Projector Mode Only) Specifies a background image to load.
$PRIVATE (deprecated, use #imagedir and #background)- (Projector Mode Only) prepended to a path of a background image, indicates the image resides in the private directory set in the Tools / Options / Miscellany tab.
#boxoff (NOT STICKY)- (Projector Mode Only) Hides the caption box. Useful for background images that have textual information which would otherwise be obscured by the caption box. This command is NOT PERSISTENT. The next caption will cause the caption box to become visible again.
#preshowstart, #preshowstop- These mark the bounds of the captions to be included in preshow looping mode. See the sample script below for an example of using Preshow looping (Tools / Preshow) Note that turning off the Preshow loop (e.g. hitting Escape) will highlight the next caption just after the #preshowstop caption, ready to send to the display.
<line>Used to add a blank line to a caption block. Since blank lines separate caption blocks, use it to represent a blank line in the script, and it will be displayed as a blank line.
In the script:                                       Shown in the display:

#center
HAMLET                                                                 HAMLET
<line>
A Play by William Shakespeare                                A Play by William Shakespeare
<line>
*Translated into modern English by Kevin Bacon       *Translated into modern English by Kevin Bacon
<erase> or <clear> or Used to clear the screen (or caption box). For rollup style, an erasure can be intermingled with other lines of text in a caption block. For popup and blockroll, intermingled erasures are ignored. For those styles, create an erasure as a standalone caption block.
^ or <music> or <note>Synonyms used to display a musical note (♪)
#musicon | musicoff(STICKY) Use
#musiconto automatically wrap all lines of a caption block in musical notes, without having to manually insert musical notes. Notice that there are no musical note indicators in the example below. Also notice that the speaker ID line below is not wrapped in musical notes. The
#musiconcommand ignores the first line if it ends in a colon (:). Since the command is STICKY, you can turn it on at the beginning of a series of musical caption blocks. Don't forget to turn it off
(#musicoff)to return to normal dialog rendering.
In the script (using #musicon):    Using manual notes:                             Shown in the display:

#musicon #pop                      #pop
DON:                               DON:                                                     DON:
Singin' in the rain                ^ Singin' in the rain ^                         ♪  Singin' in the rain ♪
Just singin' in the rain           ^ Just singin' in the rain ^                  ♪ Just singin' in the rain ♪
<nop>Short for No Operation, a <nop> text block is just a placeholder, nothing will be displayed or otherwise acted upon. This can be useful for aligning multiple streams being gated out simulaneously where the number of lines (for rollup) don't match in the caption streams, or for gating out caption and description scripts simultaneously, where you want to gate out a caption block when it's spoken, and then gate out a description directly after it without affecting the caption display.
#config  #language=en #ccstyle=rollup

;the next line marks the start of the preshow loop, and sets a background image
#preshowstart #background=Seussical Trees Preshow.png
;the next line sets popup style
#popup
The show will begin shortly.

;the next line sets another full-screen image and hides the caption box
#background=OpenDoor Presents Seussical.png #boxoff
#popup
<erase>

;the next line marks the end of the preshow loop, and sets a background image
;the caption box will revert to visible since #boxoff is not asserted
#preshowend #background=Seussical Trees Preshow.png
#popup
Exits are to the rear and
front left of the theater.

#background=Seussical NoCellPhones.png #boxoff
<erase>

#background=OpenDoor Presents Seussical.png #boxoff
<erase>

#background=Seussical Trees.png
;the next line sets rollup style
#rollup
BOY:
Now that is a very unusual hat.
I wonder what's under a hat
such as that?

;this caption continues in rollup mode because style is sticky
It could be a creature
they call the Ga-Zat
who balances things on his head,
cause it's flat,

;the following popup caption is surrounded by musical notes
#popon
^ this is a song caption surrounded
by musical notes <note>
Yes, you can bypass the initial stream picker page. The general URL would be something like:
'''''''''''''''''''''''''''''''''''''''''''''''''''''''''''''''''''''''''''
'''''''''''''''''''''''''''''''''''''''''''''''''''''''''''''''''''''''''''
'' R E L E A S E N O T E S
'''''''''''''''''''''''''''''''''''''''''''''''''''''''''''''''''''''''''''
'''''''''''''''''''''''''''''''''''''''''''''''''''''''''''''''''''''''''''
''
'' ----------------
'' Version 3.x
'' ----------------
''
'' - v3.0.0.31 - release (4/22/2026)
'' - Fixed: Activating license automatically reloads open files, ready to go
''
'' - v3.0.0.30 - release (4/21/2026)
'' - Regression: Demo mode again handles all features
'' - Fixed: License activation from Help / Registration menu no longer requires CCTheater exit and restart
'' - Fixed: License warning messages now displayed over main window
''
'' - v3.0.0.29 - release (3/16/2026)
'' - Added: Graceful error response when opening a script with no useful content.
'' - Fixed: using background images broke rollup style
''
'' - v3.0.0.28 - release (2/3/2026)
'' - Refined implementation of dynamic scroll rate, with normal speed slightly faster (250ms).
''
'' - v3.0.0.27 - release (1/21/2026)
'' - Added: Dynamic scrolling speed, adjusts to operator's gating rate.
'' Note that at faster speeds smooth scroll is not possible, may be more difficult to discern
'' new line/caption.
''
'' - v3.0.0.26 - release (12/1/2025)
'' - Added: Setting to enable/disable tooltip display in Guide Track (comments display)
'' - Added: Setting to pick preferred musical note
'' - Added: Script command #musicon/#musicoff to automatically wrap lines in musical notes
'' Currently skips lines which end with colon (presumably naked speaker ID lines.
'' Future release may have multiple templates for how to handle wrapping
'' - Added: Added dynamic submenu to Open Projector page for any loaded caption stream
'' This allows for displaying open captions with any of the loaded caption scripts
'' - Fixed: Musical note shortcut (^) now works in startup message (Tools / Options / General)
''
'' - v3.0.0.25 - release (11/11/2025)
'' - Added: #size= now settable on a per-line basis; STICKY
'' - Added: Comment lines are now parsed and displayed as tooltips (mouse hover on a cell)
'' - Added: Find and Find Again now search comments in addition to text
'' - Added: Local and External TCP/IP values can now be selected and copied to clipboard
'' - Fixed: Percent character in text now correctly displayed
'' - Fixed: Prevent blank values in key TextServer settings (prevents random clobbering of those settings)
'' - Updated documentation
''
'' - v3.0.0.24 - release
'' - Fixed: Regression error, line-level alignment now propagates correctly through scripts
'' - Fixed: Size setting in script now propagates to #preformat captions
'' - Added: language directionality properly set to RTL for Arabic/Hebrew/Urdu/Yiddish
'' (but currently still need to set #right in script for those languages to display right justified)
''
''
'' - v3.0.0.23 - release
'' - Fixed: For zoom captions, popup style now correctly transmits plain text (no html markup bleed-thru)
'' - Note: Zoom for Windows now correctly shows rollup caption. Zoom for Mac worked all along
'' - Fixed: Changes to font styles in Tools/Options now properly updated, CCTheater restart not needed
'' - Fixed: PREFORMAT spaces properly preserved on lines with inline script commands
'' - Added: Box geometry settings and scripts now obeyed for all three pages (mobile/hybrid/projector)
'' - Note: Tools options allow for different setting per page, while a script command (#box=...)
'' applies to *ALL* pages
''
'' - v3.0.0.22 - release
'' - Added: script command for font size
'' - Block level: script command #SIZE=ValueUnits (e.g. #SIZE=2.3vw, #SIZE=32px, etc.)
'' - Added: #PRE as alias for #PREFORMAT (convenience for multi-column captions)
'' - Added: Allows decimal values for font sizes in Tools/Options UI
'' - Added: "vw" to fontSize unit picklists in Tools/Options UI
'' - Changed: #PREFORMAT command now turns on word-wrap for the caption; previously overflow was invisible
'' making it easier to see sizing mistakes in multi-column caption blocks
'' - Changed: Current highlighted (pending) caption in guide track now positions to second row in list
'' when possible making it easier to see pending caption in the context of previous caption block
'' - Fixed: #left/center/right settings now properly "sparsified" in the guide track display; only
'' changes displayed
'' - Fixed: Double-click in Guide Track now handled properly (like a single click)
'' - Fixed: clicking in the guide track sometimes painted duplicate rows
''
'' - v3.0.0.21 - release
'' - Added text alignment settings in Tools/Options/TextFormat for each of POP and ROLL/BLOCKROLL (STICKY)
'' - Added script command #CONTINUE to suppress blank line between caption blocks. (NOT STICKY)
'' - Added script command for text alignment (STICKY)
'' - Block level: #TEXTALIGN=left|center|right|default (at beginning of caption block, STICKY)
'' - Line level: #LEFT CENTER #RIGHT (appended to individual lines) STICKY
'' - Added script command #COLOR=value for text color (STICKY)
'' - Block level: #COLOR=blue or #COLOR=#rrggbb (at beginning of caption block, STICKY)
'' - Line level: #COLOR=blue or #COLOR=#rrggbb (appended to individual lines) STICKY
'' - Added script command #BOX=value for box geometry (e.g. #BOX=top:0px;left:50%;height:50%;width:50%
'' for top right quadrant) (STICKY)
'' - Added script command #PREFORMAT for preformatted (columnar) captions (e.g. #PREFORMAT) (NOT STICKY)
'' - Changed: captions that roll in are now always displayed even if they're too big for the box; they
'' used to be erased before they were seen
'' - Changed: switching between ROLL and BLOCKROLL no longer clears screen
'' - Fixed: Selecting Tools/Options when it's already showing/minimized doesn't crash
''
'' - v3.0.0.20 - release
'' - UI Box geometry settable and working for projector page
'' - UI Box geometry not implemented for mobile/hybrid pages
''
'' - v3.0.0.19 - release
'' - Disabled (not yet implemented): Text box geometry settings now properly saved
'' (top/left/height/width) between sessions
'' - Fixed: Projector mode, when using custom background image, scrolling text caused image to shift up
''
'' - v3.0.0.18 - release
'' - Added: Ability to set default font family and size for each page (hybrid/mobile/projector) from Tools/Options.
'' - Should be easier than creating/editing ...Private.css files for simple setups and usage.
'' - Added: Ability to set caption box geometry for each page (hybrid/mobile/projector) from Tools/Options.
'' - Should be easier than creating/editing ...Private.css files for simple setups and usage.
'' - Added: Ability to set caption box geometry for each page (hybrid/mobile/projector) from Tools/Options.
'' - Changed: hybrid and mobile pages now have the same (larger) button size on the channel picker page.
'' - Fixed: In Guide Track table, rollup mode, red highlight no longer drifts lower and lower for a many-lined caption
'' - Fixed: Server(v3.11) mobile/hybrid page refreshes no longer repeat last caption on projector page (singleChannelMode)
'' - Fixed: AD Audio comfort message (stream ID) not erased during orientation change
'' - Fixed: reconnected AD-Text stream voicing
'' - Fixed: menu (in client) made fully visible when activated (touching screen or clicking button)
''
'' - v3.0.0.17 - release
'' - Fixed: In the editor, Find sometimes crashed.
''
'' - v3.0.0.16 - release
'' - Fixed: Default caption style (in Tools/Options/Miscellany tab) now properly obeyed during script load
''
'' - v3.0.0.15 - release
'' - Changed: Erasures can now be embedded within a caption block.
'' - For rollup mode, this works intuitively.
'' - For popup and blockroll, embedded erasures are ignored (when the caption block contains dialog
'' - As before, for popup and blockroll, create erasures as standalone caption blocks
''
'' - v3.0.0.14 - release
'' - Added: Rollup display now automatically scrolls to bottom of screen to help Chrome/iOS
''
'' - v3.0.0.13 - release
'' - Added: CTRL-SPACE sends previously displayed event, in case of mistaken early send of current event
'' - Changed: Orientation change on client no longer displays Back menu automatically
'' - Changed: CSS: channel menu buttons and text taller
'' - FIxed: ESC now correctly doesn't reposition after #preshowend when not already looping
'' - Added: hint on how to end preshow loop (ESC to stop)
'' - Fixed: #ccstyle=xxxx in scripts now properly supercedes UI setting in Tools/Options
'' - Added: New #ccstyle=blockroll / #blockroll sends full caption blocks in rollup mode (easier for operators)
''
'' ----------------
'' Version 2.x
'' ----------------
'' - v2.0.0.31 -Release
'' - <erase> | <clear> now works during rollup style
'' - added Open Projector Page menu item for ease of use
'' - fixed more vertical overlapping issues during rollup
''
'' - v2.0.0.30 -Release
'' - Fixed Reload function with no active script, ignored
'' - Fixed, Reload immediately after startup no longer lands on last caption
'' - Removed cruft from Pref/General tab, BGColor label was covering some On Exit options
'' - Enabled Test Display and Clear Display from Prefs/General tab
'' - Force Prefs and Log windows to first open on same screen as main window
'' - Dispose of stream handle after reading file to make sure it's not locked for external editors
'' - Improved calculation of height of wrapped rollup text, no longer overlapping surrounding lines
''
'' - v2.0.0.29 -Release
'' - CSS styles (from bgImages) now override UI-set styles (currently only color and backgroundColor
'' - Image CSS can now set font-family (as well as most other things. Font size still affected by direct element settings in UI.
'' - Updated documentation for CSS styles
'' - Dimmer (on mobile page) currently broken, to be fixed in a future rev.
''
'' - v2.0.0.28 -Release
'' - TextServer update, still 1.002
'' - added redirect for /projector to /projector.html
''
'' - v2.0.0.27 -Release
'' - TextServer update to v1.002
'' - fixed projector channel info for default projector.html redirect
'' - User Interface
'' - fixed channel list anchor when resizing window
''
'' - v2.0.0.26 -Release
'' - (installer) added NodeJS installation warning to installer
'' - check during startup for nodejs.exe
'' - fixed error when using malformed zoom caption API token, now gracefully warns
'' - updated help documentation around markup
'' - Markup:
'' - #ccstyle synonyms explained (pop/roll etc.)
'' - background image load side effect loading .css
'' - css identifiers/classes etc. for color, background, left/top/width/height, etc.
'' - Miscellany:
'' - allow outbound/inbound connections in firewalls
''
'' - v2.0.0.25 -Release
'' - FIXED:
'' - parsing script #config line for style
'' - Main window startup barker is now properly obfuscated on launch
'' - fixed regression error: Canceling a File Open dialog crashes app
'' - fixed regression error: blank line between rollup captions erased screen
'' - ADDED:
'' - default text color can now be customized, in addition to background color (in Tool/Options...)
'' (This (currently) affects both webstreams (index.html) as well as projector mode (projector.html))
'' - text and background color controls added to main window
''
'' - v2.0.0.24 -SKIPPED
''
'' - v2.0.0.23 - Release
'' - updated help documentation around markup, imageDir, etc.
''
'' - v2.0.0.22 - Release
'' - fixed bug in Zoom mode, sometimes crashed on startup (fetchNextSeqNum)
''
'' - v2.0.0.21 - Release
'' - preshow looping now starts immediately but uses prefs settings between captions
'' - fixed regression error after zoom implementation, popup mode misbehaved
'' ''
'' - v2.0.0.20 - Beta Release
'' - added Zoom captioning mode. Requires user to paste in the API token from Zoom client
'' - user-settable Pre-Show timer delay between captions
''
'' - v2.0.0.19 - Release
'' - fixed regression error parsing captions, preshowstart/end again correctly located
''
'' - v2.0.0.18 - Release
'' - PROJECTION MODE: fixed JS error, no longer checks for brightness slider on client
'' - PROJECTION MODE: captionPane now responds to CSS sizing for .captionPane during bgImage changes.
''
'' - v2.0.0.17 - Release
'' - fixed cross-thread bug when restarting server during custom logo option setup
'' - added text brightness slider on mobile screen
''
'' - v2.0.0.16 - Release
'' - added support for custom images to be displayed on main mobile page (stream selection screen)
''
'' - v2.0.0.15 - Release
'' - user menu bar now displays on a timer after touching screen
''
'' - v2.0.0.14 - Release
'' - implemented #imagedir in SCRIPTS. It sets the reference directory for subsequent #background images
'' - implemented #boxoff which hides the caption box, good for full-screen background images with info.
''
'' - v2.0.0.13 - Release
'' - all entities (named, numeric) as well as html markup now allowed within Script
'' - in-built editor correctly numbers all caption chunks
''
'' - v2.0.0.12 - Release
'' - allows long filenames for directories and files referenced in Script (background images and corresponding CSS files)
'' - allows sub-directories below the private directory to keep things organized
'' - allows use of $PRIVATE as reference to private directory in Script (instead of -priv@te-)
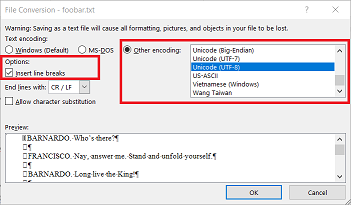
'' - now properly reads UTF-8 script into in-built editor and exports back to UTF-8
''
'' - v2.0.0.11 - Release
'' - correctly works with multiple displays, showing form at startup at last position if possible
'' - include deactivation button with CTRL key down during Registration form.
'' - check for license AFTER main window comes up
''
'' - v2.0.0.6 - Pre-Release
'' - fixed port setup, now correctly reflects Tools/Options settings for random ports and works on port 80
''
'' - v2.0.0.5 - Pre-Release
''
'''''''''''''''''''''''''''''''''''''''''''''''''''''''''''''''''''''''''''
'''''''''''''''''''''''''''''''''''''''''''''''''''''''''''''''''''''''''''